Showing posts with label crafts. Show all posts

Wednesday, May 2, 2012

Update on the Crown Royal Project

I have made some more things out of the crown royal bags.

Here they are:

1. The crown royal blouse. My sister in law wanted a shirt and I was a little hesitant at sewing together tons of bags and making a patchwork shirt. It seems like a lot of work and well flannel isn't really suited to a blouse. So I fooled around on my old dress form and came up with this. It doesn't look patchwork (except for the dye lots not matching) and there aren't too many Crown Royal logos making things look busy. I'm quite pleased. Now what to do with the three blouse patterns I already bought?

Crown royal blouse


Side View
I had originally planned on having a zipper on the side, but added some grommets and gold braid to add to the flair. This shirt took about 6 -8 bags worth of fabric, cut apart, pieced, stretched etc. I tried to use the original overlock seam, as well as the original drawstring placket. It was a PAIN to work on a very pilly stretchy flannel and try to match up pre-existing hem lines. It was definitely a project. I was able to use the original grommets on the top seam for a strap and hallelujah it worked. 

A bit of an issue with matching up the existing overlock seams. Whoops
I didn't use the original braided rope drawstring that came in the bags because to cut apart the bags to make the pieces I had to cut them.  I hope my sister in law likes it. It's a bit of a bear to put on, but maybe that's just because my dress form doesn't bend or stretch much.

Next on the agenda: 

2.Golf Towels

I had no idea what these were but Kendra (sister in law who acquired all these bag) wanted to try to make some masculine things out of them. I researched them and they are just towels with grommets on them to hang on a golf bag. 

Here was my first attempt.

Well THAT was disappointing.

It ended up looking like a badly made diaper. So, with all the stretching and what not I scrapped this particular idea and came up with another one. 

Much improved

This looks better, and instead of making folded over seams, I just faked my own gold overlock edge by mixing some yellow and gold threads together. It still stretches and looks somewhat messy, but much less messy than the first. I do hate when my sewing looks "home-made". 

Then came one of my ideas:

3. Headband. 

Work out clothes and no makeup, and frizzy hair,
the embodiment of  SEXY, thats me.

You will have to forgive the bad picture. I had no one else to model and as this was late at night and I decided not to put on make-up or fix my hair. I know, I have no neck. Just look at the headband. 
Pretty easy to put together. I may need to make more of these.

Next I'd like to make a i-pad cover, an apron, some slippers, and perhaps a bandanna. But, alas, my quilt project is yelling at me telling me to finish it. So I think today, while my son is at Mothers day out I will sew on it.

Ruthie


Tuesday, March 6, 2012

Paint Chip Art-Pinterest

We've all established that I needed to paint a wall in my living room, behind the starburst mirror I made. But I could never decide on a color.

Well, I finally decided,  all of them.

My starburst wall with all the color behind it.


I found some great stuff on Pinterest as inspiration.


I had wanted to avoid painting the wall altogether when I decided I didn't like any of my ideas that I mentioned earlier in my blog. So, I dragged myself to Home Depot, took as many paint chips as I could. I felt strange as though I shouldn't, even though they are free. One of the paint guys came up to me and showed me that they had a little folder with 1/2"x1/2 swatches. And I told him I needed something bigger. I then asked if that was alright. He said that was what they were there for. So I felt better taking so many. I left many as well so it's not that they were out of paint chips after I left.

The paint swatches I took were from Behr. I loved them because they were 3" x7" and that's just perfect. The bigger the swatches the more color on my wall.

I brought them all home and tried to keep them in the same order they were in on the paint swatch wall.

Laying out the order

final panel of greys

After I figured out the size of my wall panel I cut out some contact paper and peeled it back one line of swatches at a time and stuck them on. I then followed the same procedure with the rest of the colors . I had originally thought I would use all the colors, red, oranges blue, green, the whole rainbow. But I began to have more swatches than I could carry so I kept it in the cool spectrum.


I had originally thought to put it vertically behind the starburst, but changed my mind after laying it out on the floor.

After that, I just pinned up the contact paper/paint chip panels on the wall with thumb tacks.


My only regret is that I didn't center it evenly on the wall.  It's off  by a few inches, but, I just don't feel like taking it down yet.


I'm pretty pleased with it. My husband even told me that it "looked cool". Of course, from him he could be pulling my leg.

Ruth

Wednesday, February 22, 2012

The Nook Cover

Last year I and my brothers and sisters got our Mother a Nook. She is an avid reader. Many of us are bookworms as well. I had borrowed it for a trip and before I went (because I drop things a lot) I looked for a cover to protect it. I never found one I liked (I only went to Walmart) and they were all too expensive. So I did what every weirdo person does...I made my own with things I had already.

Here it is.

I had this fabric in my stash. They were curtains that I had turned into a slipcover for a love-seat and then abandoned when I had gotten bored with it.

Aren't you glad someone invented Velcro? It's just super.

The nook cover is stabilized with thick fusible interfacing. It's normally for crafts or for sturdy purses, so it fitted my project perfectly. It's just fabric, bias tape, some rick rack, 1/4" elastic, 3/4" velcro, and some thread and interfacing. The bias tape stretched, which isn't surprising since that's it's purpose, and the zig zag stitching didn't turn out beautifully in contrast on the rick rack, but all in all, I was pleased and it functions perfectly.


Ruth

Sunday, January 22, 2012

Starburst Mirror-Tutorial


So, its been awhile. I have procrastinated getting back to blogging. But I hope I will be better in the future.

During the holidays I began a project. A project of decorating my house. I moved my furniture from storage, put pictures on the wall, and generally made my home my own. I had been living on borrowed furniture for almost two years because we had assumed living here would be temporary. It wasn't. So we moved our furniture in and I began a long awaited and very happy process of making my house a home.

One of my projects was hanging up decorations. Well, I had an empty wall for awhile above my couch. It was a lonely wall. I brainstormed and thought and searched and decided on a starburst mirror. But I wasn't in love with the size, styles and prices of the ones available. If they were perfect they were too expensive, if  I could afford them the size or color wasn't right.

I love Pinterest so I found many to look at. Quite a few people made their own. So, here's my inspiration and my subsequent tutorial on how to make a starburst mirror.
Lovely but not quite right.

This I found online at Target.com. I liked it but it was only a clock not a mirror.

I love this one but it's gold and I wanted silver.
So I got my materials together and began this crazy project.

12" plastic plate (hobby lobby $1.99)
100 (12") wooden dowels ($2.99 for a set of 25)
Glue gun (already had it)
silver spray paint (already had it)
Hang Tite Glue for slick surfaces ($3.00)
Picture hanging hooks
Garden Shears (already had it)
8" mirror ($3.99 on sale at Hobby Lobby)

First I divided all the dowels evenly and started cutting them into three sizes. I cut 1/3 in half (six inches), and the other 1/3 of the dowels I cut at 9". The others I left at 12".  Then I got my glue gun and started to glue.

I glued them in a pattern of 12", 9", 6", 9", 12", 9", 6" and so forth.

Yay!!! 
Then I spray painted the whole thing.
After spray-painting it I glued some hooks onto the back.
I also glued a bit of felt on to the sticks to stabilize them more and to make sure they didn't scratch my wall. I put some framing wire between the to hooks and voila!!! Ready to glue on my mirror.

Unfortunately, I didn't scrape off my spray-paint on the plate, or let the glue set for 2 minutes before putting on the mirror. Needless to say the glue never set and the mirror fell off. So I scraped off the spray paint under the mirror, and re-applied the glue, let it sit for 2 minutes and then squished them together. I set some weights on the mirror and let it cure for 24 hours and this time it held like a champ.

Here's my finished star burst mirror hanging out on my formerly naked wall.
I'm pleased as punch.

Here's my sexy instagram photo.

All in all it was a great project, not too hard, and in my opinion really worth it. And for those of you who might add that the starburst mirror is so over as a trend, you are correct. It is. But I don't care. I'll never be fashionable at the correct time. Go figure.

Ruth


Wednesday, December 21, 2011

Pinterest

I have been stalking Pinterest for awhile now and trying to do the neat crafty artsy stuff that is often featured.

Some are great and work out perfectly, some don't.

For the Christmas season I found some great wreaths that I wanted to make. I don't have any wreaths, I don't have much in the way of Christmas decorations so this year I wanted to remedy that.

Here was my inspiration:


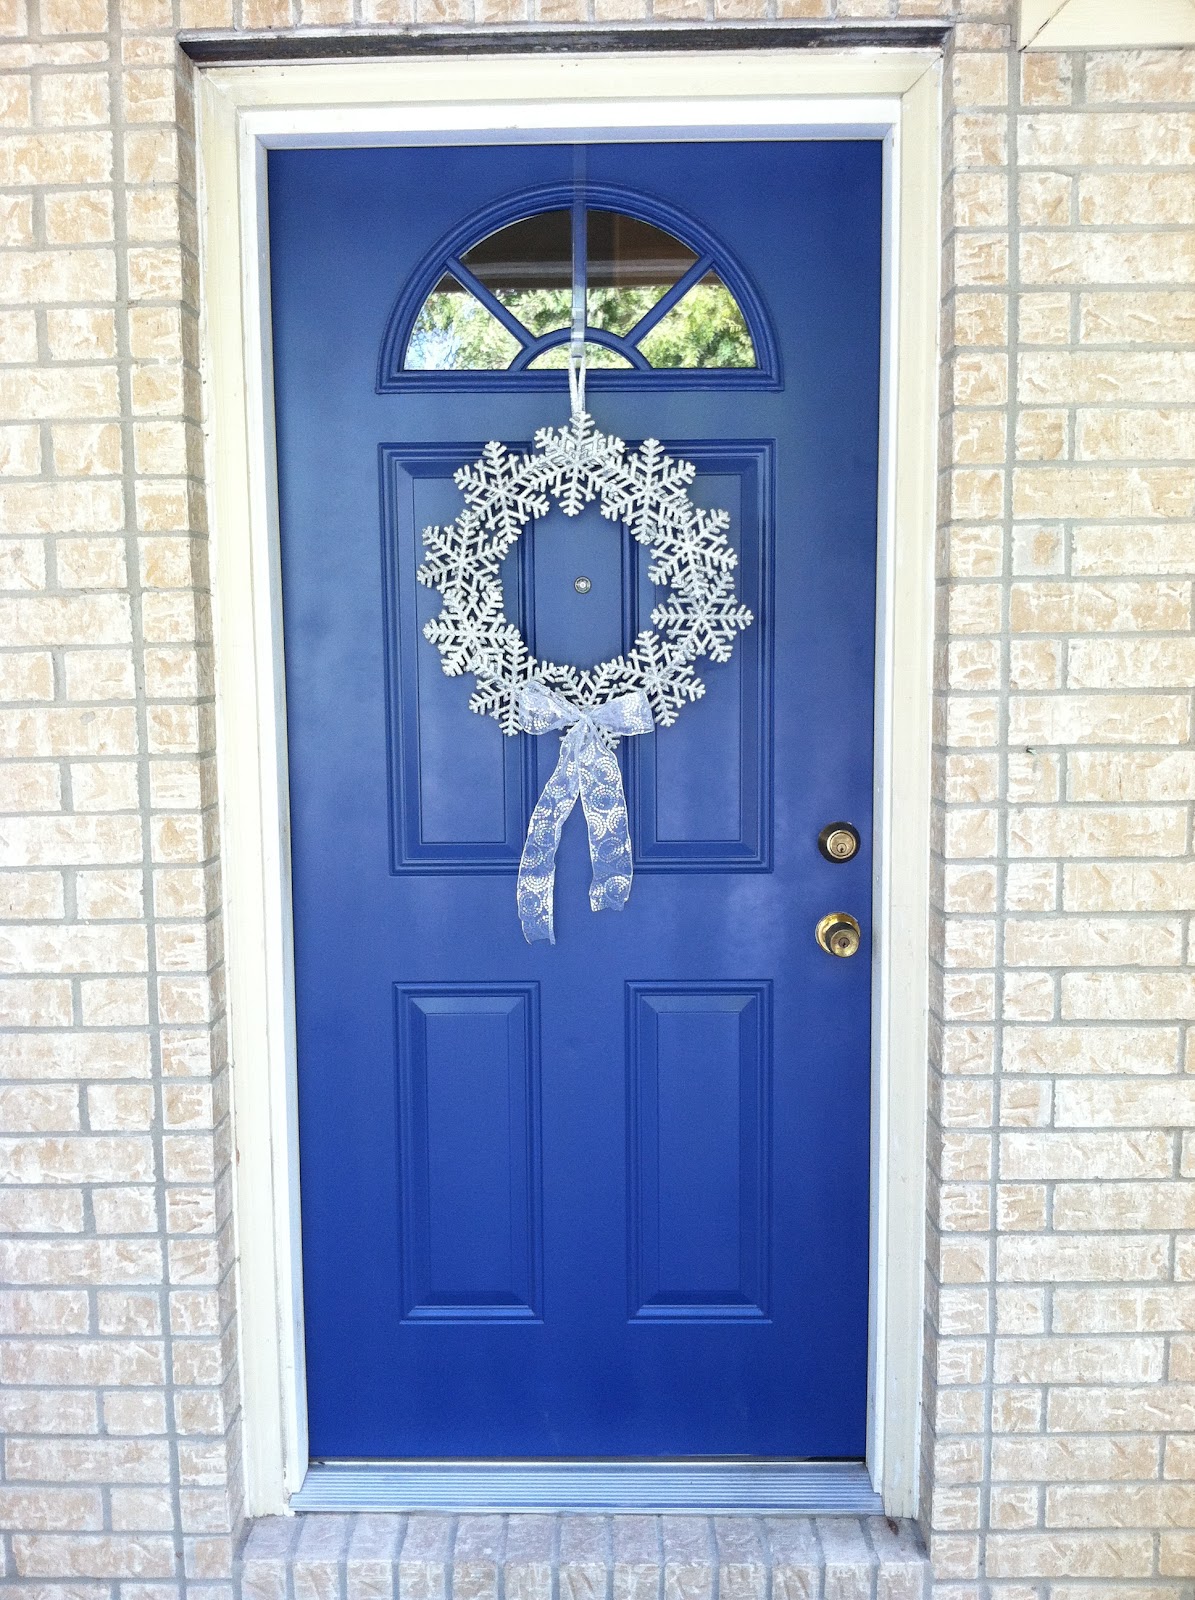
I thought it was beautiful, especially against my blue door.

Here's mine.


All it took were some silver glitter snowflakes from Big Lots, an embroidery hoop, some silver paint, a ribbon, and a lot of hot glue.  I'm really pleased with the way it turned out.

Here's my other try at a Pinterest inspired Wreath.

I thought it was perfect because 1. I love candy canes, and 2. it's unique.

I found out that it was much harder than I thought.


I used the Bob's candy-canes in cherry. Which are my most favorite in all the candy canes and I have tried many. I had tried to avoid using hot glue since it would melt the candy and make it inedible, but alas, it was the only thing that would hold. I also used way too many ribbons in way too many colors. I changed the design too much and it just didn't look right after I finished.

In the immortal words of The Bloggess...."Meh, they're not ALL winners."

I'm not convinced that this candy cane wreath can't be done, I just need to re-think it some more.

Until then,
Ruth

Tuesday, July 5, 2011

Weighted Blanket Project

I just yesterday finished a project I had been working on for a bit of time. My sister-in-law asked me to make a weighted blanket for her daughters birthday present. I had no real idea of what a weighted blanket was or what it would do. I assumed it was a blanket with some sort of weights in the edges to keep it always looking nice on a bed. So I asked started researching. Well, a weighted blanket is a Occupational Therapy tool for a variety of needs. Some of them are used for adults and elderly who have trouble keeping calm, falling asleep or who need some comfort. The weights are calming, I guess like being held. It's used for children who have ADD, autism, or just restlessness and trouble sleeping. So, I figured, hey, it's a new challenge I'll give it a shot. The beads that are used in weighted blankets are usually polystyrene beads, used in dolls or other fabric toys that need some bulk and stiffness, but also need the ability to move. I ordered ten pounds since the quilt I was making needed to be 6. Size for these blankets are varied depending on the size of the person using it. They also make weighted vests for walking around.

I ordered some very soft yellow minky fabric and tried to come up with how to make it on my own. I found out after I had been halfway through, that there was a much easier way to do this quilt, but alas, my research wasn't very thorough and I really suffered through a much more complicated way at first.

Here's some great info on weighted blankets and a tutorial on how to make one by Craft Nectar. It also has a downloadable pdf pattern that would have kept me from pulling out my hair if only I had found it at first.

The idea was to make an inner layer that held all the beads in 4'x4' squares, to distribute the weight evenly, and then put a soft minky layer, and a satin layer outside it, like a duvet and sew them all together. Here's the beginning of the inner bead layer.

I sewed several strips onto another layer of fabric to make the pouches to hold the beads. I sewed them on one side only, and then began to sew perpendicularly to those stitches to create a grid pattern. 


I began to parcel up the beads per pouch. I did the math and found out that four teaspoons of beads would create the right amount per pouch that would create a 6 pound blanket. 

Here's a photo of the beads after they were sewn in to the pouches. 

I started to glue the sides together after sewing them proved to be disastrous. (broken needles, half filled pouches and a lot of strain and irritation.) After I filled and glued the pouches I waited for them to dry and then sewed them together. I did make a mistake when I tried to use a larger spoon to put the beads in the pouches, I put four teaspoons in the large spoon and the put it in the pouch, after  awhile I estimated how much four teaspoons would be and ended up putting in too many. The quilt became 10 pounds as opposed to 6. It was a bear to sew this thing. The weight was always pulling the quilt off my sewing machine. I sewed thru the bead breaking my needles, and beads, oh the beads ended up everywhere. My house is covered in them. My husband joked that I should have just bought another ten pounds  and just poured them on the floor, since that's what happened anyway. I don't think I will make another one of these quilts, so I really hope this one does the trick.
Here it is finished. It's HEAVY. My husband and I tried in on and it's comfortable and calming, my son hated it. So perhaps there's something to all this after all?

 Here's the back side in the satin. I had to sew the inner layer in to the satin backing to stabilize it.
It's comfy, and the fabrics feel great. But, a word to the wise, if you want to make one of these, do you research, go to Craft Nectar and create the quilt their way, don't do it my way, and take your time and remember it's messy. But, the outcome is great, and if it's what you or your child needs, it's worth it.

You can also buy these quilts ready made, they can go from $100 to $400 depending on size and style. I spend about $80-$100 on materials on this one. So, it may not be cheaper if you choose to make a quilt out of nicer fabric than you can get readymade on the other quilts. Minky is expensive but oh, it is heavenly to touch. It was a good experience for me and I hope it's as satisfying to use as it was to finally finish.

Now onto the lady bug project and back to my lullaby book project. I took a week off during a final for my creating web pages class. I'd show you the final web page that I coded in HTML but it's heinous looking. I am very much a beginner.

Oh well, I guess you can see it. Just don't judge.

http://quiltsbyrudy.webs.com/

It's just the beginning my friends, just the beginning.

Ruth

Monday, June 20, 2011

X and O's quilt is finished!!!

Maybe if you've been following this blog you would have remembered my blue and white quilt. It was called the "Single girl in a Batik dress", "Devil in a blue dress", and now I'm calling it X and O's. Or hugs and kisses. Which I hope will become pretty obvious to you.


I'm very pleased at how it turned out.

I didn't do the all-over quilting myself. I used Kell's Quilting.

Kelleigh did a masterful job and I am really happy with my tic-tac-toe quilt. I just can't stop renaming it can I?

You can find Kell's quilting at:

www.kellsquilting.com

She is one great girl!

All thanks to those who helped out, mainly my husband who is always very accommodating to my quilting/crafting obsession.

Ruth